
Introduction:
This article is an easy and more detailed version of the SharePoint guidance find under
How to: Perform ASP.NET-Related Development with Visual Studio extensions for Windows SharePoint Services, SPG article is great but I think the problem is that:  It is so brief. It doesn’t complete the full development cycle with SharePoint (Master pages and security is not taken in consideration). It doesn’t touch many expected issues that developer may expire while working with custom ASP.NET SharePoint development.
Technologies and Environment Preparations: Visual Studio 2008 SP1 (You will note that there is a visual studio bug that may be solved in later Service Packs but at least it exists in my case). Windows server 2008 (I think it doesn’t matter to use windows server 2003 R2). WSS 3.0 SP1 (I think it doesn’t matter if you use previous or later versions). IIS 7 (Or IIS 6) VSeWSS 1.3 CTP
I want to mention that after installing VS 2008 + SP1 you need to download the VSeWSS 1.3(or later) add-in and install it in your machine (where SharePoint & Visual studio are installed).
Assumptions: User who reads this should have familiarity with Visual studio 2008, ASP.NET, .NET framework assemblies and Namespaces, , Simple XML skills and WSS 3.0
configuration. Always when you read my blogs, Gray paragraphs are there for extra illustration, you can safely skip them if you don’t want to understand why we did that or how we did that, so skip them if you are in hurry!!!
Plane:
Before we start, it is good to know what we are going to do, so we will:  STEP 1 – Create a project using Empty STEP 2 – Adding an ASP.NET Web Application project. STEP 3 – Link the pages from the ASP.NET Web Application project to our Empty project. STEP 4 – Do some configurations on the project to allow it works with SharePoint. STEP 5 – Handle SharePoint master page issues.
Solution:
-
STEP 1 – Create a project using Empty template
In Visual Studio 2008, create a new project with Empty Project Template; In the Name text box type ASPCustomPage.Tutorial.SPPagesProject and in the Solution Name type ASPCustomPage Press OK.

Empty project template is one of Visual Studio extensions for Windows SharePoint Services, you need to have VSeWSS installed in your Visual studio 2008, you can also select any other templates rather than Empty and you will get the Quick deploying, packaging and debugging features.
You will be prompted with Select Trust Level Window, Keep it Full Trust (Deploy to GAC), press OK

When you work with SharePoint pages development; you have two deliverables, Mark up pages and DLLs (Code behind); this window allows you to select where to place your DLLS, placing you DLLs in the GAC makes the assembly accessible from all the web application on the server and gives the assembly a full trust level.
You will have an empty project like this:

- STEP 2 – Adding an ASP.NET Web Application project.
Right click on the solution and create new project with ASP.NET Web Application project template:

Name the project ASPCustomPages.Tutorial.WebApp, press OK.

Now, we have got the following:

- STEP 3 – Link the pages from the ASP.NET Web Application project to our Empty project.
In the ASPCustomPages.Tutorial.WebApp project, delete the Default.aspx file, the App_Data (Optional) folder, and the Web.config file, you will get something like:
Add a new ASPX project item to ASPCustomPages.Tutorial.WebApp project.
Name it :TestPage.aspx, click Add.
Drag and drop a label to the TestPage.aspx for a test, name it “This is my first custom SharePoint page“
Add the TestPage.aspx file to the ASPCustomPage.Tutorial.SPPagesProject project as a link to the existing item. To link a file from another project, right-click the ASPCustomPage.Tutorial.SPPagesProject project , then click Add Existing Item, navigate to the file you want to add, and then click Add As Link in the Add drop down list, full story are detailed in the figure below:

You will get something like:
- STEP 4 – Do some configurations on the project to allow it works with SharePoint.
Create a new item of type Module (one of templates that are installed for SharePoint) and place the linked TestPage.ASPX file in the new module, name the Module item: FirstPage, click Add
When you install VSeWSS extensions, you will get 5 new project templates and 10 new item templates and Module item template is one of them, check that in the picture below: 
Now, our project looks like:
Delete the sample.txt, Keep Module.xml Drag and drop the “TestPage.aspx Link page” into the FirstPage Folder, in other words make the solution look like the following:
Edit the Module.xml file to include a File element. Update the Path and Url attributes to the file name of the .aspx file. This deploys the page when the SharePoint solution is deployed, in my simple case; the Module.xml will look like:
Path attribute refers to the reference path of the file in visual studio project and URL refers to the URL of the page in the SharePoint site, in this case our page will be deployed here http://ServerName:port/TestPage.aspx
<?xml version="1.0" encoding="utf-8"?>
<Elements Id="b707b5eb-4b48-4a90-98e7-e62f474559f8" xmlns="http://schemas.microsoft.com/sharepoint/">
<Module Name="FirstPage">
<File Path="TestPage.aspx" Url="TestPage.aspx" />
</Module>
</Elements>
Solution Configuration manager can be accessed by right clicking on the solution and click on properties (as illustrated below).
Clear the build will prevent Visual studio from generating DLLs for this project, so Why??? This action is because we only use this project for ease the design and drag/drop controls… So we don’t need the code behind you will see how… 
Open the linked code-behind file from the ASPCustomPage.Tutorial.SPPagesProject project and change the namespace from ASPCustomPages.Tutorial.WebApp to ASPCustomPage.Tutorial.SPPagesProject , in other words do the following on TestPage.aspx.cs and TestPage.aspx.designer.cs:

This will tell the compiler to compile the code into ASPCustomPage.Tutorial.SPPagesProject project.
Now, build the project, check that there is no errors.
Open the markup of the file from the ASPCustomPages.Tutorial.WebApp project, in the page directives; remove the CodeBehind attribute from the markup, remove AutoEventReciver and then edit the Inherits attribute to match the assembly information for the ASPCustomPage.Tutorial.SPPagesProject project.
Don’t modify anything else (rather than the Page directive), keep everything as default .
Your page directive will look exactly like this:
<%@ Page Language="C#" Inherits="ASPCustomPage.Tutorial.SPPagesProject.TestPage,ASPCustomPage.Tutorial.SPPagesProject, Version=1.0.0.0, Culture=neutral,PublicKeyToken=e6805455ca617aa0" %>
Be careful! Your DLL will have different PublicKeyToken! So don’t try to copy it.
Normally; every signed assembly has these attributes you can use a tool called Red Gate’s .NET reflector, this software gives you these details about any signed assembly, I think you also notoced that the ASPCustomPage.Tutorial.SPPagesProject is already signed as it is a SharePoint project template.
Markup means the *.ASPX page or the *.ASCX user control, here we use something called 5-parts assembly naming where we use the follow format Namespace.Class , NameSpace, Version, Culture, Public key token.
To deploy the solution change the Start browser with URL in the ASPCustomPage.Tutorial.SPPagesProject properties page in the debug pane:
Add Safe control entry into the web application Web.config of the particular web application it will look like:

<SafeControl Assembly="ASPCustomPage.Tutorial.SPPagesProject, Version=1.0.0.0, Culture=neutral, PublicKeyToken=e6805455ca617aa0" Namespace="ASPCustomPage.Tutorial.SPPagesProject" TypeName="*" Safe="True" />
You can find the Web.config on the C:\inetpub\wwwroot\wss\VirtualDirectories\1983 folder, search on the <SafeControls> element, if you are a sharepoint developer you should do it smoothly.
Also the data (assembly name, version and public key token) here can be get by the reflector software we talked about before.
You can automate the process of adding Safecontrol by adding Safecontrol entry into the manifest.xml file located into the <Solution><assemblies><Assembly><safeControl> check this link for more information
http://msdn.microsoft.com/en-us/library/ms442108.aspx
Deploy the solution…

As you can see from the picture below, you need to write the site collection URL and followed by the Page URL that can be got from the module.xml file
Go to the URL and see the Testpage.aspx like the following:

-
STEP 5 – Handle SharePoint master page issues.
Here we still haven’t done with this! What a bad test page!!!! Where are SharePoint and master pages, Style and Navigation…..? Here SPG stopped and I will start!
As you can see now you can do the design of the page from the TestPage.ASPX in the ASPCustomPages.Tutorial.WebApp and you can do the development from ASPCustomPage.Tutorial.SPPagesProject , I think that’s cool, but not enough…
Add the following Tag to the page header:
![]()
For more information about master pages in sharepiont check “http://msdn.microsoft.com/en-us/library/ms476046.aspx”, but here is the conclusion:
~masterurl/default.master is just a token that returns the current site master page so by default:
~masterurl/default.maste = _Catalogues/masterpage/default.master
, so if the designer creates a new Master page call and call it Something.master and set it as the default master page, then
~masterurl/default.master = _Catalogues/masterpage/Something.master.
If you didn’t get it; go and read the mentioned Microsoft article.
Delete all the body and everything but the page directive, and add content control, the file will look like this:

Full page code is here:
<%@ Page Language="C#"
Inherits="ASPCustomPage.Tutorial.SPPagesProject.TestPage,ASPCustomPage.Tutorial.SPPagesProject, Version=1.0.0.0, Culture=neutral,PublicKeyToken=e6805455ca617aa0"
MasterPageFile="~masterurl/default.Master"%>
<asp:Content ID="Content1" ContentPlaceHolderID="PlaceHolderMain" runat="server">
<asp:Label ID="lblTest" runat="server"
Text="This is my first custom SharePoint page"></asp:Label>
</asp:Content>
SharePoint master page contains a place holder to hold content, so any page that needs to go under SharePoint master page need to have at least 1 asp:content control that has a ContentPlaceHolder property set to PlaceHolderMain, everything is configurable in SharePoint in terms of names, number and location of place holders but this is the default..
Deploy the solution again, you will have something like this:

Cooooooool, but not enough why??? Try to go to the design mode of the TestPage.aspx in the visual studio… Visual studio is struggling now coz he tries to know where is the hell ~masterurl/defaul.master, so here I will do some work around to fix that…

The Master Page file ‘~masterurl/default.master’ cannot be loaded….. What can we do?!
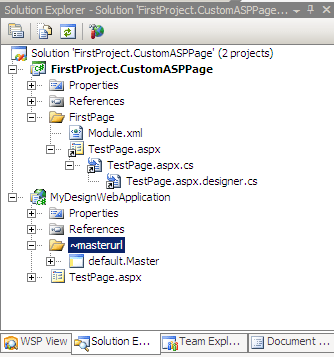
Add a new folder to the solution call it ~masterurl, then inside this folder add new master page call it default.Master.
Now the solution looks like:
Rename the asp:ContentPlaceHolder1 to PlaceHolderMain and delete the asp:ContentPlaceHolde calls head. So that the default.Master will look like:

<%@ Master Language="C#" AutoEventWireup="true" CodeBehind="__fallback.master.cs" Inherits="ASPCustomPages.Tutorial.WebApp.__fallback" %>
<!DOCTYPE html PUBLIC "-//W3C//DTD XHTML 1.0 Transitional//EN" "http://www.w3.org/TR/xhtml1/DTD/xhtml1-transitional.dtd">
<html xmlns="http://www.w3.org/1999/xhtml" >
<head id="Head1" runat="server">
<title></title>
</head>
<body>
<form id="form1" runat="server">
<div>
<asp:ContentPlaceHolder ID="PlaceHolderMain" runat="server">
</asp:ContentPlaceHolder>
</div>
</form>
</body>
</html>
It is important to assign ID=PlaceHolderMain because this master page will hold the TestPage while you are in the development time..
Then add another master page to the solution call it __fallback.Master do the same thing you did with the previous master page, it should look like:
__fallback.Master has two underscores at the beginning so be careful.

The solution now is look like:

Then –strangely– turn off the visual studio and start it again then open the solution and check the design view of the TestPage.aspx it should works fine, nobody knows why? Also me! It seems it is a little bug in the Visual studio 2008 SP1.

Here we are done with Master page integration….
But now we have only added a label, what if we add a button? If you want to add a button you need to write this code:
using System;
using System.Collections.Generic;
using System.Linq;
using System.Web;
using System.Web.UI;
using System.Web.UI.WebControls;
namespace ASPCustomPage.Tutorial.SPPagesProject
{
public partial class TestPage : System.Web.UI.Page
{
protected void Page_Load(object sender, EventArgs e)
{
}
protected override void OnInit(EventArgs e)
{
Button1.Click += new EventHandler(Button1_OnClick);
base.OnInit(e);
}
protected void Button1_OnClick(object sender, EventArgs e)
{
lblTest.Text = DateTime.Now.Millisecond.ToString();
}
}
}
So you need to register the code in the cs file in order not to be inline code in the ASP.net page:
Remember a very important point here:
Inline code is not recommended in ASPX pages, that means events in controls have to be registered in the OnInit() method of the page like the code above, Inline code will work OK if the master page is not customized but once the designer customize it, it will start making errors
That’s all..
Here is the source Code:


Hi Jamil,
Thanks for the tutorial. Very informative and useful. I would just like to know if this approach is the same when I will be using Visual Studio 2010. Thanks again!
No, you should not use this approach for development with visual studio 2010 as things become easier and more mature
If you have the chance to post for the SharePoint 2010 when developing custom ASP.NET pages kindly create a new section with regards to the tutorial for the benefit of others. Thank you so much!
Wonderful article! We will be linking to this great content on our site.
Keep up the good writing.
Hi Jamil,
I don’t have a work to say thanks. Great man.
Anyway to do it without VSeWSS?
• You can’t get the SharePoint Workflow project templates working on x64 OS.
o These templates shipped with Visual Studio 2008 and are not part of VSeWSS. They do not work on x64 OS.
Simply want to say your article is as surprising.
The clarity in your put up is simply cool and
i could think you are a professional on this subject.
Well together with your permission let me to
take hold of your RSS feed to stay up to date with coming near near post.
Thanks 1,000,000 and please keep up the rewarding work.